My Favorite Editing Software
- Blaze Fyre
- Oct 26, 2020
- 5 min read

Updated: Dec 9, 2020
This post contain references to products from one or more of our advertisers. We may receive compensation when you click on links to those products
We all have to start somewhere and sometimes you don't know where to start! I remember when I first started webcam modeling I had no idea how to edit my content. I used to use Windows Movie Maker for video and a website called Picmonkey for photos. Eventually, I taught myself some basic Adobe Photoshop skills. Although limited, I was finally able to create my own advertisement graphics and profiles on Chaturbate.
Since then, I have discovered my holy trio of editing software. You don't need advanced skills to use these programs and you can find tons of helpful tutorials online. I'll be going over my favorite features in these programs and why they're my #1 choices in the sections below.
Filmora for Video Editing

"Our software and products are used in over 150 countries world-wide. We’re continually inspired by our users, and we’re committed to creating simple and easy-to-use software for their needs."
I've used Adobe Premiere Elements, Adobe Premiere Pro, Power Director, and Windows Movie Maker in the past. What I love about Filmora is how simple it is to use. When you are you're own boss you begin to accept that you can't be an expert in every direction you are being pulled. I don't have the time to learn new programs and I want something I can use quickly.
Exporting
My biggest issue with editing software was understanding the file sizes and bitrates. Different platforms will have different file size limits. Filmora's export menus are simple and user friendly just like the rest of its features.

You can choose from a list of formats on the left or preset settings for certain platforms at the top. Filmora will show you the estimated project size and settings before export. This is helpful when you have a platform like Manyvids that limits video file sizes to 2GB.
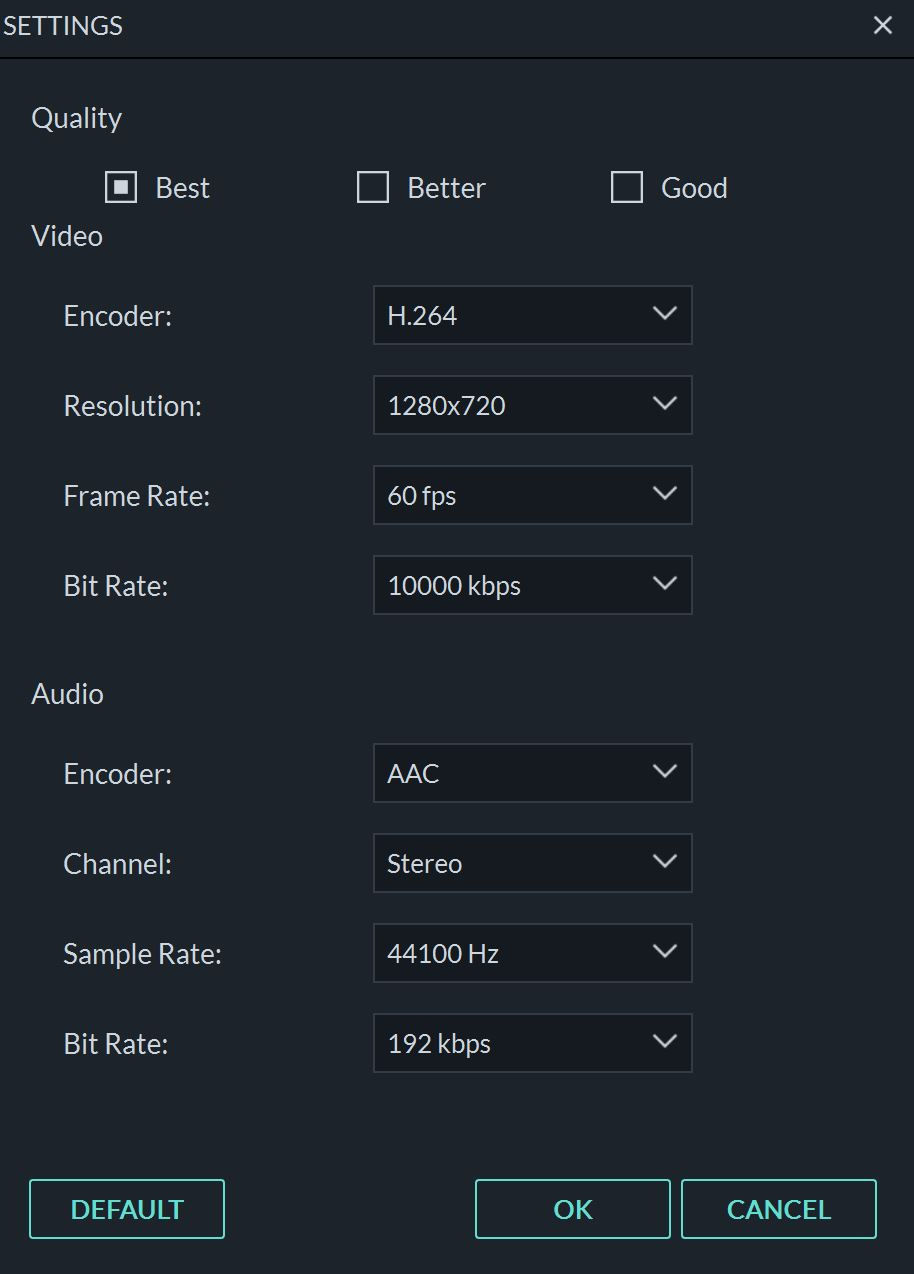
If you notice your video file size is too large you can click on "settings" to see more export options. Here is where you can change some things to help with file size. The larger the bitrate, the larger the file size will be. Be careful! Too low of a bitrate can reduce quality.
If you are unsure about what bitrate to select, Filmora has made it easy for you. There are 3 quality preset options at the top of the menu. I don't recommend messing with audio settings unless you are an advanced user.
"We don’t just look at solving the challenges our users have now. Our solutions are designed to help them on whatever journey they take in the future too. To become more creative and productive, to manage with ease, and to feel safe."
Interface

I cannot sing enough praise for this interface! The buttons are big, easy to read. and they explain themselves. The window sizes are adjustable to your workflow. It's everything you could want as a user looking for functionality.
You can get Filmora for as cheap as $39.99 per year with the individual subscription plan. Filmora offers other plans at higher prices if you need more support, downloads for the stock library, or premium effects.

The Filmora learning center is a great place to learn more about your software and what it can do. There are tips, video tutorials, and courses you can take! The Filmora library is also home to effects, soundtracks, and other features you can download and add to your content. Some of this is included with your subscription and others are available for an additional fee.
Photos

"Lightroom Classic is a complete toolbox for professional photographers, organized into modules. Each module focuses on a specific portion of the photographic workflow: the Library module is for importing, organizing, comparing, and selecting photos; the Develop module is for adjusting color and tone, or creatively processing photos; and the Slideshow, Print, and Web modules are for presenting your photos."
Lightroom has a slight learning curve. I will admit that it is not the most user friendly or the easiest software out there. However, it changed my editing game for the better, it's fairly cheap to subscribe, and it is definitely easier to use than Photoshop. This software has saved many photos that I thought were awful
Interface
Ok....I know it looks like a lot....and it IS a lot. The basic editing sliders are on the right side. You can create beautiful photos by just playing around with these simple sliders. You can reset an image to its default state with one click of the "reset" button.
The left side is host to your collections and filters. It took me a while to understand how "filters" work in Lightroom. One of the coolest things is that you can tweak an image and save your settings as a new filter! You can also download filters that other people have created from online. Collections are groups of photos that you have imported.
The installation of these "filters" is not very straightforward, but also not too complicated. Try searching for "Lightroom LUTS", "Lightroom Filters", and "Lightroom Presets" on Google. Once you get the hang of the program you will be happiest when creating your own.
Lightroom also features some great preset brushes. You can use brushes to paint away backgrounds, soften skin, whiten teeth, spot correct, and so many other things.
Bonus Tip: Lightroom is an awesome way to organize your photo collection since you can export to certain folders and create collections
You can get a subscription for Lightroom on its own or as part of the Adobe Creative Cloud Photography plans. Both plans start at $9.99 per month.

Exporting
I love the export process because you can have your photos automatically watermarked, put a size limit on files, and choose where they are exported to. The organization on my computer has completely changed for the better because of this.
Each time I edit a new set I export the files to the same folder as the originals. The edits go into an "edit" folder and all copies are easy to find.

Adobe has some wonderful tutorials online and a very helpful community. You will find so many amazing "how-to" videos on Youtube and other bloggers willing to share tips.
Graphics

"Design anything. Publish anywhere.
Use Canva’s drag-and-drop feature and professional layouts to design consistently stunning graphics."
Canva was another advertising game-changer for me. This platform makes it so easy to create stunning promotional graphics, calendars, social media posts, etc. The list goes on and on! I've used Canva for collages, profiles, advertisements, tip menus, pricing info. and calendars.
Interface
Everything is self explanatory. You can choose from 1000s of templates to get started. Then you can customize them with different elements. There are frames, borders, clip art, professional photography, gifs, stickers, fonts, music, videos, backgrounds, and your own personal uploads to choose from.

Pricing
The best part? It's free to use! Of course, if you want to do some more advanced work you can purchase the Pro package at the insanely cheap price of $9.95 per YEAR.

Exporting
The export process is so awesome because you can convert your designs into different sizes with the press of a button. Did you make something for Instagram that you also want to post on Twitter? No problem. Canva will automatically resize it for the best fit and most attractive cropping. You can save in a bunch of different formats and export multiple designs.


Comments