DSLR Guide and Self-Shooting Tips
- Blaze Fyre
- Jan 28, 2021
- 10 min read
Taking selfies with your phone's camera is a perfect way to get started when making content. There is nothing wrong with the simplicity of it. In fact, if your workflow is simple you are more likely to create more content and more often! Quality isn't the determining factor of whether or not you will be successful. The most important thing to focus on is what your audience wants.
However, if you're like me, and you enjoy being overwhelmed for no good reason, you can kick up your content game with a DSLR! Now you can learn from my mistakes so you don't have to make the same ones.
Note: Before choosing a camera it would be a great idea to check for live streaming compatibility. This way you can get two uses out of your new device. Cameras need to have "clean HDMI output" for streaming. This means that display info. and icons will not show on your stream when broadcasting. I always recommend the Elgato capture cards for streaming, but there are other alternatives. If you are going to use Elgato you can check their website for camera compatibility.
Timers
If you want to start off simple you could set a timer for 10 seconds, push the button, and then run to get into position. This is exhausting and doesn't motivate me to make photo sets though.
Infrared Camera Remotes - Avoid Them!
An upgrade to the simple built-in timers would be a camera remote, but there are a few do's and don'ts to using these. If your camera uses infrared technology for its remote then it's probably not the solution for you.

This is because the infrared technology requires your remote to be in front of the camera and in view of the sensor when used. Your remote will be visible in most of your photos and there are not settings on these simple remotes to combat this. What you need instead is a timelapse feature. This will either be built into your camera, wired remote, or wireless remote.
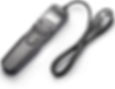
Timelapse Features - Built Into Cameras, Wired Remotes, and Wireless Remotes
First, check to see if your camera has any timelapse options in the settings. If it does then you don't need to order any more gear. If not, you are going to need a wireless or wired remote. I recommend wired simply because of ease of use. Pairing wireless remotes and dealing with the dead batteries isn't something I like to deal with.
Timelapse features are incredibly useful because you will be able to tell your camera when to take a photo, how often, and how many. This means the camera will basically operate on autopilot as you do your thing. I set my wired timelapse remote to take the first photo 20 seconds after I press the button, then it takes another photo every 15 seconds until I have 5 photos. I will review those photos to see if I like them, change positions, and repeat the process until I have a full set.
Bonus Tip: Some newer cameras have compatible apps in the Google Play store. Sometimes these apps will allow you to have complete control over your camera, just like a remote would. In my experience, these apps tend to run slow and clunky. They're not as easy to use as timelapse features/remotes.
External Monitors
You can connect your camera to TVs, PC monitors, and special external monitors so that you can watch what you're doing as you're taking photo sets. This is a good inexpensive alternative to buying a capture card. Although, I highly recommend a capture card for a streamlined workflow in the future.

Connect the HDMI cable to your camera and monitor. Then check your camera menus to make sure playback settings are correct. Sometimes you need to set the camera for "clean HDMI output" for an external monitor or change the resolution.
Bonus Tip: Make sure you check your camera ports and order the correct cable (hehe guess who didn't do that about 10 times?). Also, be sure to get a generous length of cable. Beware, if you need to move your camera you will most likely need to move the entire setup with it unless you get that extra generous cable. Then you will most likely only need to do minor adjustments.
Battery Life
Batteries were a stressor for a while. I wouldn't have enough or I would forget to charge them. Not having a fully charged battery has ruined so many content plans. When picking out a new camera look for one that is capable of USB charging or compatible with an AC adapter power supply like the one shown below.

The only thing you need to worry about with prolonged use is potential damage to your camera. I can say that I have accidentally left my Sony A6500 and Sony A7Riii on overnight with both USB charging and a power supply on with no issues.
Bonus Tip: If you get a camera with USB charging you may need to check the menus for settings related to this feature. I accidentally bought a power supply before realizing my Sony A6500 was capable of a USB power supply. It wasn't until I found this setting in my A7Riii menus that I realized how much easier USB C power would have been in the past.
My First Camera - The Panasonic Lumix FZ200

I got my first camera around 2013 and it was a Panasonic Lumix FZ200. I choose this camera because the FZ200 has a flip-out screen that swivels and turns around. This type of screen is the best option if you are less experienced with tech and gadgets. You will be able to shoot right out of the box.
Panasonic Lumix FZ200 key specifications
24x 25-600mm equivalent lens with F2.8 across the zoom range
12.1-megapixel High Sensitivity MOS sensor
12 fps continuous shooting
High-Speed Video at 120 fps (HD) or 240 fps (VGA)
1080 60p video recording in AVCHD or MP4 formats
3.0-inch, free-angle LCD screen
Panorama Shot mode
RAW and RAW+JPEG data recording option
This camera is technically considered a "bridge camera" which means that it's not a full DSLR so you won't be able to change lenses. Back then, I didn't know anything about cameras so it probably wasn't the best choice I could have made, but this camera has lasted me a long time and still proves to be useful to this day.
Camera Basics
If you're a true beginner, like I was, then we need to talk about camera basics before anything else. All of the numbers and letters sound confusing, but it's not too bad!

F-Stop
When you see something like "F2.8" it is describing the f-stop capabilities of the camera. A low f-stop will give you more bokeh and better photos in low light. A higher f-stop will give less bokeh and darken the image. Lenses with lower f-stops or bigger range are typically more expensive. My favorite lens is an F1.4.
Shutter Speed
Low shutter speeds will allow more light into the camera for brighter pictures but moving subjects will be blurred. A good shutter speed for sharp portraits is 1/200, but if you don't have adequate lighting you may need to reduce your shutter speed. I typically shoot 1/80-1/100 without any trouble.
MM
This is the focal length capability of your lens. Smaller numbers will be a wider angle, allowing more of your room and yourself to fit into the frame. If you have a small room you probably don't want anything over 35mm unless you have a full-frame camera. If you plan to shoot in a variety of different places it might be best to find a zoom lens with a bigger range. Look for something in the 25mm-200mm range.
ISO
This will also control the brightness of your image. Be wary though, the higher you bump your ISO, then the more grain you will have in your images. I like to shoot with my ISO and f-stop as low as possible. If you have good lighting that means you could probably bump the shutter speed up as well and your image should be amazingly clear with good bokeh.
JPEG
This is a very standard image format that most people are used to seeing. You can set your camera to save photos in JPEG or RAW. JPEG images take up less space compared to RAW files, but they reduce the image quality. Use JPEG if you are concerned about space on your SD card or PC. JPEG is also a good option if you are not familiar with editing software like Lightroom or Photoshop.
RAW
This setting will preserve your photos in the highest quality your camera is capable of storing. Your file sizes will be larger than JPEG, but less processed and compressed. When working with RAW files, your editing process will be less destructive as well. Because you are working with untouched, original files, you won't destroy any quality in the process. To edit RAW photos you should probably be using a program like Lightroom though. Lightroom is capable of importing and converting RAW to JPEG during the editing process.
Bonus Tip: A lesson I learned when first working with RAW was that my files sizes were too large for upload on certain platforms. When exporting a photo, a dialog box will open, and you can choose to cap your file sizes at whatever you want to.
My Second Camera (another learning lesson) - The Nikon D3300

Nikon D3300 key features
24.2 MP DX-format (APS-C) sensor
Fixed 3.0" LCD
1080/60p HD video
5 fps continuous shooting
700 shot battery life
Let's see if you notice the biggest problem I didn't consider before choosing this camera...
Oh, right! Remember when I said the swivel out screens are the best if you aren't very experienced with tech yet? Yeah, the Nikon D3300 has a standard stationary screen. This was a big problem as someone who is used to seeing themselves on webcam. I didn't know how to pose, and more than half of the time, I wasn't in the frame.
This can easily be solved by putting a mirror behind your camera, but alas, I am determined to make things insanely more complicated for myself! This is when I discovered that you can connect most DSLRs to an external monitor via HDMI cables.
My Third Camera (and current backup) - The Sony A6500

Sony A6500 Key Features:
24MP APS-C CMOS sensor with 425 phase-detection points
Tilting rear touchscreen
UHD 4K at 24/25/30p
USB charging
Timelapse mode (great for self-shooting!)
5-axis in-body image stabilization
11 fps continuous shooting for up to 300 JPEGs / 100 Raws
1/4000 sec maximum shutter speed
There are a bunch of reasons to love this camera and one is that it is fantastic for both live streaming and photos. The autofocus is fast and crisp. The a6500 is so light too! It is also really good with low light situations. This camera is compatible with the Elgato capture cards so you can plug in and use it with OBS.
Keep in mind that this is a mirrorless cropped sensor camera. This means that lenses meant for full-frame cameras, used on this body, will appear more zoomed in. That's why I mentioned earlier that you will need to consider the focal length (MM) when choosing a lens that will work in a smaller space.
My Fourth and Current Camera - The Sony A7riii

Sony A7Riii Key Features
42MP BSI CMOS sensor
Faster, lower-noise image processing
10 fps shooting with full AF, 8 fps with 'live' updates between shots
Improved autofocus, including more tenacious Eye AF mode
Wifi, Bluetooth, and NFC connectivity
4K/30p and 1080/120p video (120p would be great for some sexy slowmo)
Video AF less inclined to refocus to background
Twin SD Card slots
True 14 bit uncompressed Raw, even in continuous drive mode
USB charging
This camera doesn't have a timelapse setting in the menus, but that's ok for me since I prefer to use my wired remote. I wanted to be able to get the most use out of one of my best lenses so I needed a full-frame camera. It is completely unnecessary to go to this extreme with your equipment. There are much cheaper options that will work just fine. For me, I enjoy collecting and testing as a hobby.
The autofocus is much more improved compared to my A6500, but the body is quite heavy. That's one thing I don't like, but it comes with the territory when you start to upgrade. I've been impressed by the bokeh when coupled with one of my favorite lenses.
Favorite Lenses
Sony A6500 Kit Lens - 16-50mm f/3.5-5.6 OSS
This is actually a great starter lens so you won't need to spend more money unless you are fully ready for a quality upgrade. I like this lens because I can get a variety of different zooms in my live shows.
Sigma 16mm f/1.4 DC DN Contemporary Lens
There is no zoom on this lens which is something I wish it had, but the 16mm is a perfect focal length for a cropped sensor camera in a smaller space. This lens has great color and the autofocus seems to be even crisper and more responsive than the kit lens.
Sony FE 24mm f/1.4 GM Lens
A very pricey lens that would really only be worth the upgrade if you plan to have a full-frame camera. I got mine before I had my full-frame and its performance on my A6500 was impressive but unnecessary. It also appears more zoomed-in when not used on a full-frame body and I didn't like that in my smaller cam room because it was hard to fit my entire body in the frame. Now, I use this lens on my A7riii for both streaming and photos.
My Setup
The worst part about upgrading to DSLRs from webcams is that it will change the way you work. If you are used to a certain flow then it can be hard to figure out how to make that happen again. I loved being able to move my webcam quickly from different angles and take it into a different part of the house with my laptop.
When you start using expensive fancy equipment it takes away your freedom to do that. You are now bound by lighting, chargers, cables, microphones, and software. I absolutely hate that I can't run downstairs on a whim to do a bath show. Everything has to be planned which burnout and creative block galore for creative-brained people.
I'm trying to find the magic again. How do I do that with all of this equipment? I've built at least 5 different setups. I have a mobile cart downstairs that I can roll around on my tile. That makes it easy to take into the kitchen, bathroom, and bedroom. It was a good solution for me, but the cam room remained my arch-nemesis. The burnout and frustration reached a level where I no longer wanted to cam and I still struggle to find the energy.
But I think things are changing. I've had a good long break. I needed time to think about what I wanted, what inspired me, and how to recreate some of the simplicity of my plastic-tote-desk-webcam era.
If you want a tour of my current setup you can find the video on my Youtube channel.