How to Record your Live Streams without Copyright music
- Blaze Fyre
- Feb 18, 2022
- 4 min read

This post contains references to products from one or more of our advertisers. We may receive compensation when you click on links to those products
In the golden age of online content creation, platforms like Twitch and Youtube are facing more pressure to enforce copyright violations made by users on their sites. Some of these big names claim that they have very little responsibility when it comes to what is being hosted on their platforms. It's up to individual account holders to be familiar with copyright law and abide by the terms of each platform in order to avoid account restrictions, bans, and even legal action.
Adult websites are no different and planning ahead could save you a lot of trouble. Cam sites like Chaturbate have implemented fairly strict policies regarding copyright infringement early on and rightfully so. While it may be frustrating to have your audio muted in recorded videos, they're being proactive about protecting their business.
Recently, Twitch was under scrutiny for allowing copyright music to be played during live streams. Technically, you can't stream the music you haven't paid for the rights to, but things are still a bit murky since live streaming is a fairly new concept. One thing is clear though. You cannot record and redistribute copyright music, especially if you are profiting from it. This caused panic for streamers who had pre-recorded content either muted or entirely deleted from their channels.
Now, content creators are trying to get a step ahead by separating the music they live stream from their recorded content and you should too. If you play music during your live streams and you want to redistribute or sell recordings of those streams you should remove copyright music before doing so. I'm going to explain step-by-step how to do that in the rest of this article.
Tutorial Starts Here
Click on the ".exe" link and Win Capture Audio will start to download. You may get a warning about this plugin not being safe. Use your own discretion. I trusted this source and did not experience any issues.

Once downloaded, you will be able to click the file and start the installation process. Click through the menus for standard installation.
Step 2: Open your music player, such as Spotify, and click play on a song
Step 3: Add "application audio capture" as a source.
Open OBS and click the "+" button under sources to add a new source. You should now see "application audio capture" listed in your sources. Click on "application audio capture" and a box will pop up asking you to name the source. I've named mine "Spotify" since that's what I'll be using to play music.
Once you name the source, click ok. Another box will pop up with two dropdown menus. There should be a menu option for "mode" and "session". Make sure the "mode" dropdown is set to "capture audio sessions from a specific executable". Under the "session" menu you will choose the window with your music player. In my case, "session" is set to "spotify.exe". Click ok.
This step is telling OBS that we only want to capture audio from a specific source. We are able to do that because of the plugin we just installed. In the OBS audio mixer panel you should now see "Spotify" or your chosen music player as a separate audio source from your microphone and any others.
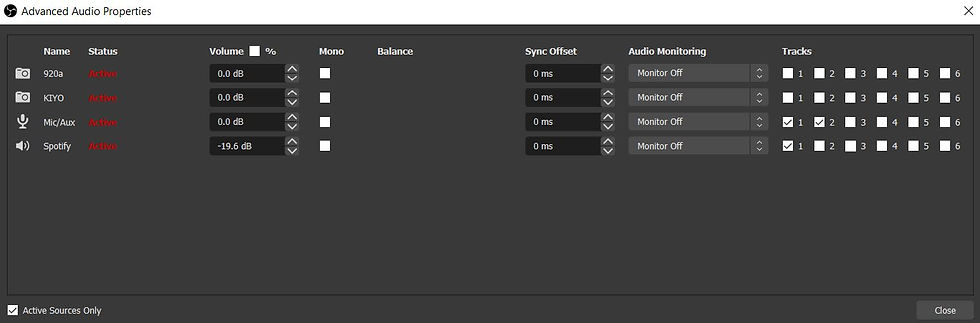
Step 4: Choosing tracks for audio sources
Click the gear icon in the OBS audio mixer panel on one of your audio sources. Then click "advanced properties". A box will open that shows more advanced options. There should be a row of checkboxes on the far right side of this menu that says "tracks". You will notice that each audio source corresponds to a certain track. By default, all of your checkboxes may be checked.
We want to tell OBS that our microphone and Spotify music player are separate tracks. Find your microphone source in this menu. Check the boxes for track 1 and track 2. All other boxes should be unchecked for your microphone.
Find Spotify or your music player in this menu. Only check the box for track 1. All other boxes should be unchecked. Close this menu and your selections will be saved.
Step 5: Track settings for streaming and recording
Now, go to file>settings in the main OBS window. Navigate to the "output" tab in the lefthand list. At the top of this menu where it says "output mode" you will use the dropdown menu to select "advanced".
There should be 4 tabs near the top that say, "streaming" "recording" "audio" and "replay buffer". Make sure you have selected the streaming tab. The next line should have tick boxes for audio tracks. Tick box 1. This tells OBS that while you are streaming the audio from track 1 will be playing to your audience. Remember, we put our microphone and music player on track 1, but we also checked box 2 for our mic!
Click on the "recording" tab next to "streaming". Look for the audio track tick boxes. Tick box 2. This tells OBS that even though we are streaming our microphone and music, we only want to record the microphone. Click apply and ok.

You are done!
However, this solution requires that you use headphones during your live stream. If you don't use headphones it defeats the purpose. Your music will play out of your speaker and your microphone will capture the audio. I suggest investing in a pair of wireless earbuds or maybe two pairs if you have fairly long live streams.
If you have more audio sources, other than your mic and music player, you will have to repeat this process for those. Just make sure you are putting them on the right track for recording! This could also be a useful guide for anyone who doesn't want their tip alerts, stream notifications, or desktop sounds to be in their recordings as well.
Note: There are additional audio settings under file>settings>audio>global devices that can either help you customize your sources or may cause some conflicts. I've disabled all other audio except for my microphone to avoid having any double audio issues. If you are only streaming with two audio sources like me, keep these same settings. If you need to stream with desktop audio, other sources etc. then you may need to adjust these to fit your needs.


Comments